
Once you or your administrator has installed JavaScript Button for Confluence, add a new JavaScript button to a page by editing the page, starting to type /JavaScript and selecting the JavaScript Button extension:
Once the change to the page is published, you can invoke the action by clicking on the button:
To edit the button, switch the page back to edit mode, hover over the button panel, end invoke the edit action:
Configuring the Button
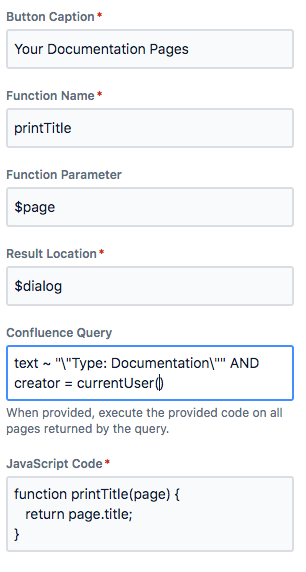
In the edit panel, you can configure the following aspects of the button:
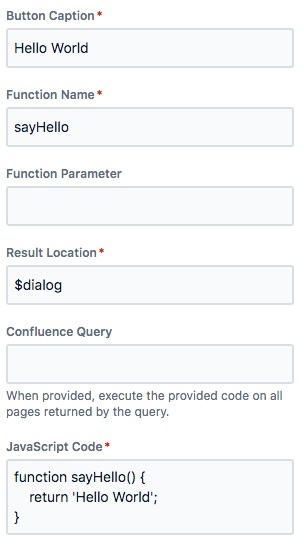
- Button Caption: The label to show on the button to the user.
- Function Name: The name of the function to invoke when the user clicks the button. A function with this name must be provided in the JavaScript Code field.
- Function Parameters: Parameters to be passed to the function. Read on to learn what you can do with this.
- Result Location: What to do with the result of the function. Use $dialog to show the result in a modal dialog. Read on to learn about other possible result locations.
- Confluence Query: By default, the function is executed on the page on which the function is located. In this field, you can provide a CQL query. When doing so, the function is executed on each page returned by the CQL query.
- JavaScript Code: Finally, the code containing the function to execute when invoking the button.
Function Parameters
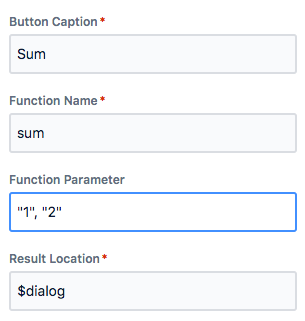
In the configuration section called Function Parameters, you can provide parameters that will be passed to your function when the button is invoked. For example, you can define a function to calculate the sum of two values like this:
With the following JavaScript Code:
function sum(value1, value2) {
  return `The sum of ${value1} and ${value2} is: ${Number(value1) + Number(value2)}`;
}
The function named sum must have 2 parameters. When invoking the button, JavaScript Button for Confluence will pass 1 as value for the first parameter and 2 as value for the second parameter.
Note that the type of these parameters is string, hence if you want to calculate the sum of the two values you first have to convert them to a Number as shown above.
Field support
Now, so far this is not terribly useful. What we need is the ability to read information from a page to then analyze this information with a JavaScript function. That’s what a field is for.
A field is simply a line of text anywhere in the document consisting of a field name and a field value separated by a colon and a space like so:
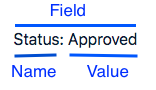
The Field in the example above has name Status and value Approved.
You can then define a Function Parameter such that JavaScript Button for Confluence will pass the value of a field to your function using the following syntax:
$('Status')
To get back to our sum example: You can add anywhere on your page, two fields for the two values, like so:
Value 1: 1
Value 2: 2
And then change the configuration for your sum function like this:
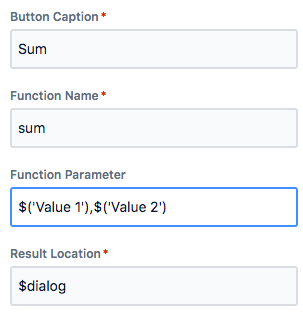
When the user invokes the Sum button now, Value 1 and Value 2 will be taken from the current page.
Store result to Field
Not only can you read field values to pass them as parameters to the function, you can also store the result of the function in a field. To do so use the same syntax as you use for Function Parameter for the Result Location, i.e.
$('Sum')
to store the result of the sum in a field named Sum.
Here is a complete example:
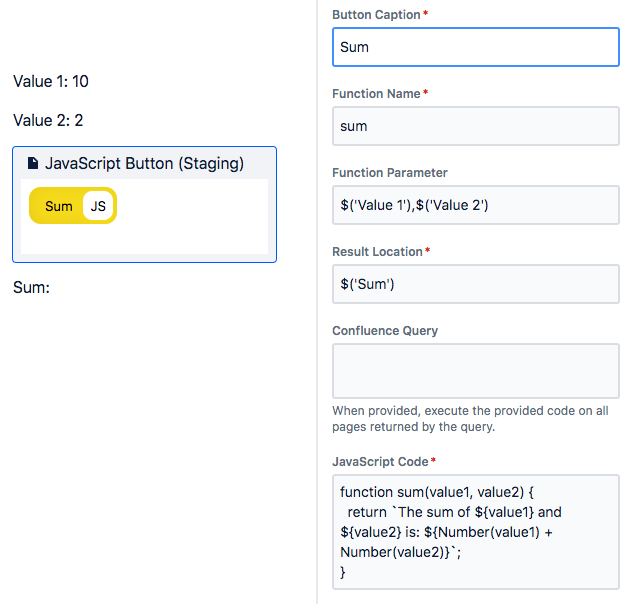
When invoking the button, the result is written into the Sum field:
Remote Field Value
You can also read the value of a field on a page other than the one that contains the button. The syntax for Function Parameters is:
$('Field Name', $page(9175077))
Where Field Name is the name of the field on the page with id 9175077. You can find the id of the page in the URL shown in your browser:

This for example allows you to store configuration values for all your functions centrally on one page. You can even make this page read-only for most users.
Here is a full example of our Sum function that now shows the currency as configured in the Currency Field on page 9175077:
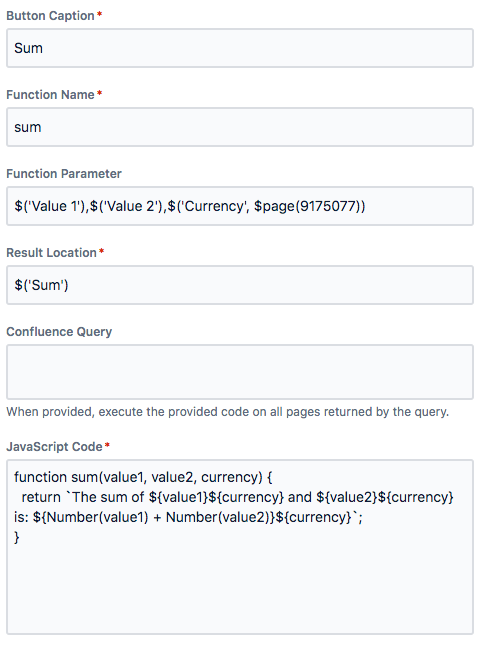
Resulting in (depending on the value of field ‘Currency’):
Sum: The sum of 10$ and 2$ is: 12$
Note that this is not supported when storing results to a field.
Fetch Code from a Field
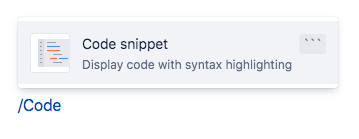
With more complex scripts, it can become quite annoying to write the code in the small configuration panel. JavaScript Button for Confluence supports fetching code from a Code snipped Panel located on a page in confluence. To do so add a Code snipped panel to your page by typing /Code and hitting enter:
Write the code into Code snipped Panel (you can even select JavaScript as the language for your code). Then give this Code snipped Panel a name, by writing its name directly above the panel, exactly as you do for fields:

You can then reference the code in the panel in the JavaScript Code section with the field syntax, like so:
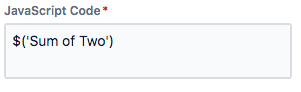
Like any other field, the code field can also be remote using the page syntax like:
$('Sum of Two', $page(9175077))
Meaning, that you can host your JavaScript code on a central page and use it anywhere in confluence. You can even make this page read-only for normal users, so that normal user can not change/brake your code.
Console log
JavaScript Button for Confluence executes your JavaScript code on the server side and not on the client side. This means you can not debug your code with your browser’s debugger. However, to help you analyze your program, JavaScript Button for Confluence supports print debugging by providing you with a console to which you can log messages. These messages are shown to you in your browser’s console.
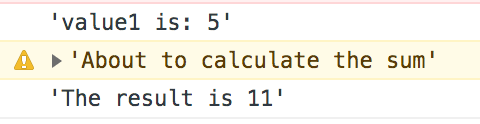
For example, when executing the following JavaScript code:
function sum(value1, value2) {
  console.log("value1 is: " + value1);
  console.warn("About to calculate the sum");
  const result = Number(value1) + Number(value2);
  console.info("The result is " + result);
  return result;
}
you will see the following statements printed to your browser’s console:
The console supports the following functions:
- log
- debug
- info
- warn
- error
Page support
Besides constant parameters and field parameters, JavaScript Button for Confluence also supports $page parameters. When using $page as parameter, the full page, including its content, will be passed to your function. For example:

Will log the following to the console:
{
  id: '3801125',
  version: {
    number: 3,
    message: '',
    minorEdit: false,
    authorId: '557058:6850f622-3434-4020-a9fd-9344832461fb',
    createdAt: '2023-06-02T19:41:01.879Z'
  },
  authorId: '557058:6850f622-3434-4020-a9fd-9344832461fb',
  title: 'Example Page',
  status: 'current',
  body: {
    atlas_doc_format: {
      value: '{"type":"doc","content":[{"type":"paragraph","content":[{"text":"This is a paragraph.","type":"text"}]},{"type":"extension","attrs":{"layout":"default","extensionType":"com.atlassian.ecosystem","extensionKey":"cbd32dac-8a30-4df5-92ee-020f5ff40fcc/0fe673e4-25a3-485e-84d0-ba07480d3e3f/static/javascript-button","text":"JavaScript Button (Staging)","parameters":{"guestParams":{"resultLocation":"$dialog","code":"function print(page) {\\n console.log(page);\\n return JSON.stringify(page, null, \\"  \\");\\n}","functionName":"print","cqlQuery":"","caption":"Print Page","parameters":"$page"},"localId":"4495c6c3-f040-4e76-87c4-8e56e6d4b756","extensionId":"ari:cloud:ecosystem::extension/cbd32dac-8a30-4df5-92ee-020f5ff40fcc/0fe673e4-25a3-485e-84d0-ba07480d3e3f/static/javascript-button","extensionTitle":"JavaScript Button (Staging)"},"localId":"b90368e2-d64c-4154-b2b3-c2949066b0f6"}},{"type":"paragraph"},{"type":"paragraph"}],"version":1}',
      representation: 'atlas_doc_format'
    }
  },
  parentId: '33167',
  spaceId: '33085',
  createdAt: '2023-06-02T19:38:52.887Z',
  _links: {
    editui: '/pages/resumedraft.action?draftId=3801125',
    webui: '/spaces/~5570586850f62234344020a9fd9344832461fb/pages/3801125/Example+Page',
    tinyui: '/x/JQA6'
  }
}
Learn more about the page format here: Pages Format
As for fields, you can also use $page as result location, this allows you to modify a page. For example, you can change the title of a page with following JavaScript Code:
function updateTitle(page) {
  page.title = "The new title";

  //You have to increase the version
  page.version.number = page.version.number + 1;

  //This is optional, but helps to keep track of changes
  page.version.message = "Updated title with JavaScript Button for Confluence";

  return page;
}
You can also use this approach to change the content of a page, for example, the following adds a new paragraph to the page when the button is invoked:
function addParagraph(page) {

  const pageBody = JSON.parse(page.body.atlas_doc_format.value);
  pageBody.content.push({
    type: "paragraph",
    content: [{
      text: "A new paragraph.",
      type: "text"
    }]
  });
  page.body.atlas_doc_format.value = JSON.stringify(pageBody);

  page.version.number = page.version.number + 1;
  page.version.message = "Added new paragraph";

  return page;
}
Learn more about the Atlas Document Format here: ADF
Last but not least: You can also create new pages. The following will create a new child page of the current page:
function createChildPage(page) {
  return {
    parentId: page.id,
    spaceId: page.spaceId,
    title: "New Child Page",
    body: {
      representation: "atlas_doc_format",
      value: '{"type":"doc","content":[{"type":"paragraph","content":[{"text":"This is a paragraph.","type":"text"}]}],"version":1}',
    }
  }
}
Note that you can only read and write the current page and not a remote one using the $page(PAGE_ID) syntax. To modify other pages you can use CQL as explained in the next chapter.
CQL
By default, the JavaScript function is executed on the page on which the JavaScript button is located. But you can also provide a CQL Query (Confluence Query Language). The function is then executed on each page returned by the query. For example, you can execute the function on every page that contains the text (field) Type: Documentation and was created by the current user:
text ~ "\"Type: Documentation\"" AND creator = currentUser()
With this query and with the $page parameter you can for example create a button that will show the title of all Documentation pages created by the current user, like so:
CQL is very powerful, learn what you can do with it here: CQL
REST API Support
JavaScript Button for Confluence supports rest calls to Jira and Confluence Rest endpoints. You can for example fetch the content of any confluence page with the following script:
async function fetch(contentId) {
  const res = await api
    .asUser()
    .requestConfluence(route`/wiki/api/v2/pages/${contentId}?body-format=atlas_doc_format&serialize-ids-as-strings=true`);

  return await res.json();
}
Note that you have to mark your function as being async and you have to await the result of your rest call in order to make this work correctly. Learn more about the Confluence Cloud REST API here: The Confluence Cloud REST API
You can also make REST calls to the Jira API. For example, this script loads all Jira projects:
async function listJiraProjects() {
  const response = await api.asUser().requestJira(route`/rest/api/3/project`, {
    headers: {
      'Accept': 'application/json'
    }
  });
  console.log(`Response: ${response.status} ${response.statusText}`);

  const projects = await response.json();
  console.log(projects);

  return projects.map(project => `${project.key}: ${project.name} (id = ${project.id})`);
}
Learn more about the Jira Cloud Rest API here: The Jira Cloud platform REST API
This is very powerful, you can, for example, create a new Jira Task with the following code:
async function createIssue(projectKey, summary, description) {
  const projectId = await getProjectId(projectKey);
  const taskIssueTypeId = await getTaskTypeId(projectId);

  var bodyData = {
    fields: {
      description: {
        content: [
          {
            content: [
              {
                text: description,
                type: "text"
              }
            ],
            type: "paragraph"
          }
        ],
        type: "doc",
        version: 1
      },
      issuetype: {
        id: taskIssueTypeId
      },
      project: {
        id: projectId
      },
      summary: summary
    }
  };

  const response = await api.asUser().requestJira(route`/rest/api/3/issue`, {
    method: 'POST',
    headers: {
      'Accept': 'application/json',
      'Content-Type': 'application/json'
    },
    body: JSON.stringify(bodyData)
  });

  console.log(`Response: ${response.status} ${response.statusText}`);
  const result = await response.json();

  return `New Issue created with key ${result.key}`;
}

async function getTaskTypeId(projectKey) {
  const response = await api.asUser().requestJira(route`/rest/api/3/issuetype/project?projectId=10000`, {
    headers: {
      'Accept': 'application/json'
    }
  });
  console.log(`Response: ${response.status} ${response.statusText}`);

  const issueTypes = await response.json();
  console.log(issueTypes);
  const taskId = issueTypes.find(element => element['name'] == 'Task')['id'];

  return taskId;
}

async function getProjectId(projectKey) {
  const response = await api.asUser().requestJira(route`/rest/api/3/project`, {
    headers: {
      'Accept': 'application/json'
    }
  });
  console.log(`Response: ${response.status} ${response.statusText}`);

  const projects = await response.json();
  console.log(projects);

  return projects.find(element => element['key'] == projectKey)['id'];
}
Note: With great power comes great responsibility.
Next
Check out our Examples